

Pod Programs in NieR: Automata are active abilities that are slotted to your A.I. Companion, the Pod. They function similarly to NieR Replicant's Sealed Verses, allowing the player to instruct the Pod/s to execute a special attack. Unlike a Sealed Verse in NieR Replicant, a cooldown occurs after using a skill instead of a magic meter. There are 17 different Pod Programs that can be found in NieR: Automata, each having its specialization in offensive and defensive commands. You can purchase them from the Maintenance Shops in the Bunker. With all three Pods (or two if you don't have the third yet), Pod Program may be charged but also has greater cool-down time. Charged version generally consist of greater AOE or three of the same attack at once.
NieR Automata All Pod Programs
Quick Search of All Pod Programs in NieR: Automata
Name |
Plug-in Chip Description/Effect |
Plug-in Chip Location |
|---|---|---|
R010: Laser |
Fires a powerful laser in the direction that the Pod is facing. Quick to fire, quick to recover from for your POD to start firing its normal weapon again, a decent cooldown rate compared to the others, piercing and can hit a target at the max Lock On range. Eternally useful. Charged: Additional laser per pod. |
Unmissable Pod Program, 2B acquires this Pod Program during the Prologue when you fight Marx. |
R020: Mirage |
Analyzes all enemies in a fixed radius, allowing combatants to deliver a series of deadly slashes to all who are caught within. It has a very short range and you CAN still be hit by enemies while doing it, likely knocked flying. Charged: Increases AOE. |
This pod program can be purchased from the Maintenance Shops in the Bunker or the Resistance Camp. |
R030: Hammer |
Summons a mass of energy that unleashes a devastating blow upon its target. Short-ish range, quite solid damage, a quick recovery and a reasonable cooldown. Charged: Additional hammer per pod. |
This pod program can be purchased from the Maintenance Shops in the Bunker or the Resistance Camp. |
R040: Blade |
Spins a Pod around the player at high speed, wreaking havoc on any enemies it touches. YOUR POD CANNOT FIRE ITS NORMAL WEAPON WHILE THIS IS ACTIVE. That combined with the ultra-short range and the somewhat slow DPS rate makes this one a bit questionable. Charged: Additional rotating blade per pod. |
This pod program can be purchased from the Maintenance Shops in the Bunker or the Resistance Camp. |
R050: Spear |
Produces a mass of energy that sprouts from the ground in the shape of deadly spears. Reasonable damage if a large enemy can be hit by more than one spear, small enemies might be lifted up/briefly impaled by it. If they aren't destroyed by the damage they'll drop back down and continue fighting. This cannot hit airborn enemies except for ones very close to the ground. Short-ish range, moderate recovery. Charged: Additional spears left and right, then all four diagonals. |
This pod program can be purchased from the Maintenance Shops in the Bunker or the Resistance Camp. |
A060: P Shield |
Deploys a protective barrier that blocks melee attacks. Charged: Increases duration. |
This pod program can be purchased from the Maintenance Shops in the Bunker or the Resistance Camp. |
R070: M Shield |
Deploys a protective barrier that blocks projectile attacks. Charged: Increases duration. |
This pod program can be purchased from the Maintenance Shops in the Bunker or the Resistance Camp. |
A080: Wave |
Generates a powerful shock wave by slamming a Pod to the ground from an elevated height. Charged: Increases damage. |
Side Quest Reward: The Wandering Couple |
A090: Wire |
Fires a wire in the direction that the Pod is facing. If it hits a foe, it launches combatant right to the target for an up-close assault. Charged: Increase range. |
Side Quest Reward: Amnesia |
A100: Decoy |
Creates an image of the user, drawing the attention of foes and firing upon them with the Pod's ranged attack. Charged: More pods firing simultaneously. |
In Route C or D, you can find this in the building of the City Ruins where you land after the Prologue. |
A110: Slow |
Creates a field that distorts time, slowing down all enemies that enter its vicinity. Charged: Increases AOE. |
Side Quest Reward: Data Analysis Freak 2 |
A120: Repair |
Emits a temporary beam capable of healing the combatants as long as they remain within its radius Charged: Increases healing rate and duration. |
Side Quest Reward: Sorting Trouble 3 |
A130: Bomb |
Throws a volley of small explosive charges over a set period of time. YOUR POD CANNOT FIRE ITS NORMAL WEAPON WHILE THIS IS ACTIVE. This also has a several-second launching delay before your character can start moving and fighting in melee again, making this one have much less overall DPS than might be expected. Moderate range, moderate cooldown. Charged: Additional pod launching explosives. |
Side Quest Reward: Find a Present |
A140: Gravity |
Unleashes a blast that sucks in any enemies in the vicinity. Does no damage but can be good for bunching up a group of enemies into one spot in preparation for a strong AOE melee attack. Charged: Increases AOE. |
Give the chips in the Side Quest, Retrive the Confidential Intel |
A150: Volt |
Restrains and shocks one nearby enemy, causing continuous damage over a set period of time. Charged: Increases damage and duration. |
Route C: Head to the area in the Abandoned Amusment Park where the Goliath Tank spawns. The Pod Program is in a dead pod next to a dead YoRHa soldier. It gives off a high pitched beeping sound to help you locate it. |
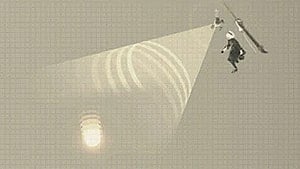
A160: Missile |
Allows a combatant to ride atop a Pod - with a certain degree of direction control - as it rushes forward into the fray. Charged: Increases damage, knock back, and distance. |
Route C: Return to the very start of the game where 2B fights Marx (the large digger goliath). Head down the walkway until you can't go straight any more. The Pod Program is on top of the shipping container in a dead pod next to a dead YoRHa soldier. It gives off a high pitched beeping to help you find it. See image below |
A170: Scanner |
Emits ultrasonic waves to scan the surroundings in search of hidden items. Acts a bit like a game of Hot and Cold. The POD emits a pulse every 2 seconds or so by default, but when an item is detected within its max range (roughly a bit longer than the Laser POD weapon) it will pulse faster as you get closer and slower as you move further away. Eventually when you get close enough it will directly reveal the item, and they are typically of higher rarity. This is a good one to keep on the POD you use the least often, and periodically switch to it/activate it as you move through areas Charged: None. |
You can obtain this Pod Program as a reward for completing the Main Quest, Redheads. |


You can get A100: Decoy in Route D as I just did it. Go to that location, the building where you first land on earth. You can get to the building faster by transporting to City Ruins: Near Factory, and the building will be right there. I have screenshots of the exact location if anyone needs them. (It wouldn't let me reply to the Anonymous comment)

- Anonymous
A100: Decoy can't be found in route D. I'm standing at the correct point right now while not having it and the corpse isn't here plus I confirmed it by researching it on other websites. The program can only be obtained in route C.
- Anonymous
A100, A150, A160 locations all emit the high-pitch sound like the pod c in desert
- Anonymous
Hey, were are we supposed to get the pictures? Do we have bunch stored somewhere here on Fextralife, do we grab them from online, or do we need to take own screenshots?
- Anonymous
I added all the programms and also how to get them.
Also who the hell designed this website... they layout is awful and editing is a pain.
- Anonymous
voltio, you got in 3rd playtrougth in the themed park, in the area that apear the tank. repair got it in a place in the forest(dont remember where xD), stil searching the other two
- Anonymous
It looks like you cannot use a POD program if you're too low on HP. Be careful.
1
+10
-1